Add Microsoft Forms attachments to SharePoint list attachments via Power Automate
- Patrick Cooley

- Jul 15, 2025
- 4 min read
Updated: Feb 19
This blog post is about a reliable technique to capture attachments from Forms and add them to a SharePoint list by using Microsoft Power Automate. We very often use Power Apps as a tool to capture SharePoint data including attachments, but you can also use Microsoft Forms and Power Automate to do it. In the process of figuring this technique out, I did a lot of things that caused the flow to fail. This technique will lead to success.
What to know before you try it
Why use Microsoft Forms? Microsoft Forms is a tool allowing you to capture data and files in a mobile or desktop experience. To take full advantage of the file upload capability of Microsoft Forms this technique can only be used within your organization.
When you use a custom form from Microsoft Forms to allow attachments, Forms stores the attachment files in the form author's OneDrive. So that's where Power Automate must go to retrieve them. The OneDrive for business connection of the person who created the form absolutely must be part of the flow or you won't be able to grab these attachment files.
The other "BLL" (big lesson learned) is that using the 'Get file content using path' is nearly impossible to invoke when someone has a complex field name in the form, such as "1 Upload image relative to Performance complaint" (vs. a basic name like "Attachments").
We're talking some really strange encoding for the file path, and given Power Automate's finicky file path translator, you are in for a rough experience if you try to use this action with a hand-crafted file path. Recommendation, always use a 'Get file metadata' action using the ID from a 'Parse JSON' action to discern the exact path...and I suppose you could use that to get the file content as well, but, in this proven solution I use the "Path" value from the 'Get file metadata' action. Works like a charm!

Flow Steps
1. Use the 'Get response details' action in your flow after a 'When a new response is submitted' flow trigger. Naturally, this step allows you to look at the action's outputs when looking at the Run history. You'll be able to discern which values are for your attachments, since the output only includes alpha-numeric strings. Your attachment will have a string of JSON to the right of the colon. See the image of the Outputs below:

2. Use SharePoint 'Create item' action to create an entry for the new item related to the form fields (or a filtered 'Get items' to get the item you need to update).
3. Use a 'Compose' action invoking the json() formula on your attachment field:
json(<outputs from the 'Get response details' -- your attachment field value>)You can look up your field (represented in the code above as between the < and >) which may simply be called "Attachments" (or another more challenging name), and when you put that field into the json() formula, the alpha-numeric value should match the attachments field from the outputs of your 'Get response details'.

4. Add a 'Condition' action to check that the Outputs from the 'Compose' action are "not equal to" null, so that you don't have an error in the flow when there is no attachment. (Use the formula value for null.)
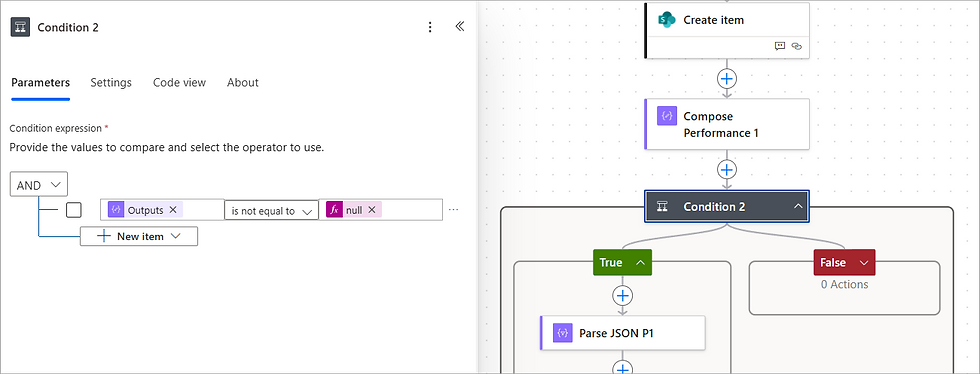
5. In the "True" side of the condition, use a 'Parse JSON' step with 'Body' from the compose action as the Content, and the Schema as:
{
"type": "array",
"items": {
"type": "object",
"properties": {
"name": {
"type": "string"
},
"link": {
"type": "string"
},
"id": {
"type": "string"
},
"type": {},
"size": {
"type": "integer"
},
"referenceId": {
"type": "string"
},
"driveId": {
"type": "string"
},
"status": {
"type": "integer"
},
"uploadSessionUrl": {}
},
"required": [
"name",
"link",
"id",
"type",
"size",
"referenceId",
"driveId",
"status",
"uploadSessionUrl"
]
}
}
6. Add a OneDrive 'Get file metadata' with the file value of 'Body id' (Power Automate will invoke an 'Apply to each' or 'For each' loop because of the array presented from the 'Parse JSON' action).
IMPORTANT: ensure that before testing the flow that the person who created the form adds their connection to the OneDrive actions. If you do not do this, your flow will fail because it lacks permission to go into the OneDrive folder location to grab the attachment.
7. Use a 'Get file content using path' (OneDrive) with the Path value from the 'Get file metadata action' to capture the file content.
8. Still in the loop, add an 'Add attachment' (SharePoint) action.
Id is from the 'Create item' (SharePoint),
File Name is from the Parse JSON action, and
File Content is from the 'Get file metadata' action.

Impossible? Never. Please let us know what you think about this technique!


Comments